
Lighting + Camera Setup for Touring in Busy Traffic: A Practical Safety Build
When you tour on a Gold Wing, you already realize that the bike is a long-hauler, yet you need something it has not compared to the traffic: visibility, predictability, and clean power management. And there is where Goldwing lighting and electrical accessories are more than nice to have. They are the ones which make other drivers see you earlier, interpret your will much quicker, and keep your upgrades useful mile after mile.
New Lighting and Electrical Upgrades in Traffic: Why It Is More Important
Touring bikes are subjected to excessive time in the worst case scenario of being observed: low sun, brake lights mixing with a sea of red, rain drops, and distracted motorists. On a big machine you are also carrying more electrical load than most bikes, and there is usually heated gear, GPS, phone charging, comms, and sometimes extra cameras. In a clever safety construction, lighting, wiring and recording are not haphazardly tacked-on.
The Actual Objective Is Not Glare, It Is Recognition
Good visibility is not about enlightening everybody. It is the development of a recognizable, predictable signature to get drivers to know exactly where you are, and what you are doing. Brightness is important, however, beam pattern, placement and stability are even more.
Step 1: Develop a Sensible Lighting Strategy
Layered setups are the most ideal settings where a job is assigned to each layer. Consider it to be seen, signal clearly and light your path.
Day and Dusk Conspicuity Lighting
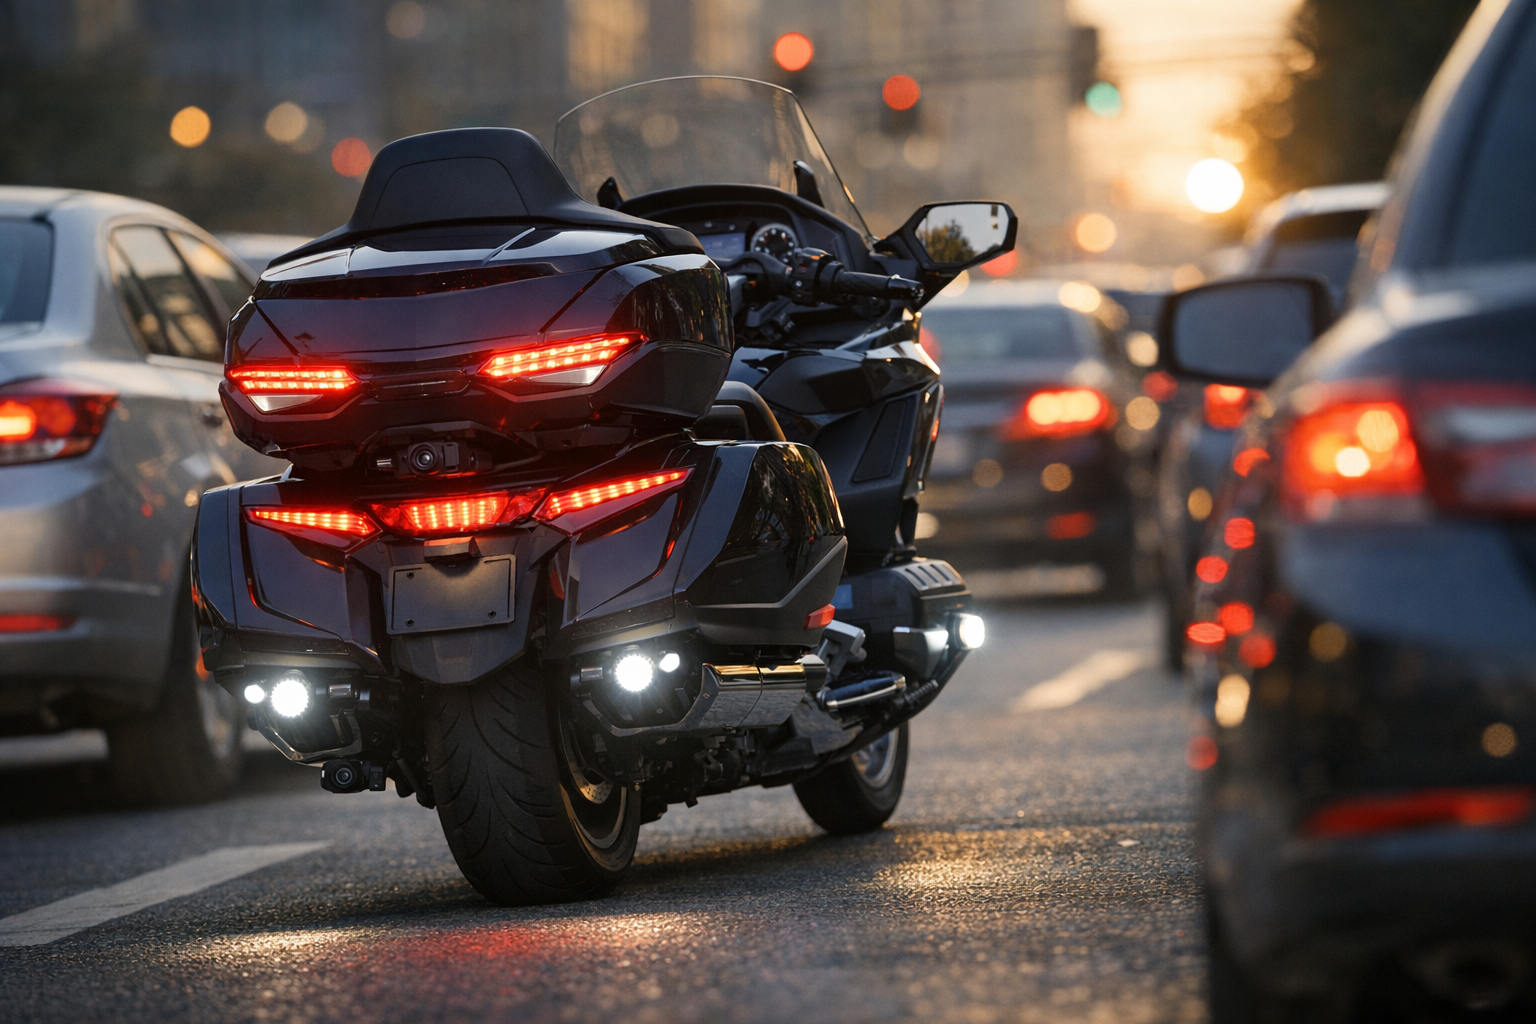
They have auxiliary LED running lights that appear low and wide so that they disrupt the single-point headlight appearance. The broader triangle form is easier to the drivers in their estimation of distance and speed. To tour during rush hours, this is the upgrade that will pay off each and every time you pass by an intersection or slow-paced lanes.
Maintain output under control and directed well. The best lights are those that can be left on without the approaching vehicles throwing furious glares at you.
Brake and Rear Visibility Upgrades
Stop and go traffic is actually dangerous due to rear-end collisions. The brighter the rear lighting pattern, the better you can react in the rear. Look at brighter LED brake bulbs, high-visibility additional brake modules, or built-in light bars which increase the lit surface.
What you desire is a rear profile that is immediately readable, even behind coloured windscreens and glare. A great light spot is frequently preferable to a small bright one.
Cutting Through Chaos: Turn Signal Clarity
Turn signals are lost in traffic congestion. By replacing with sharper and more defined LEDs and by making sure that the lenses are not visibly dirty, you make your signals pop. In case you have other rear lighting in place, then ensure that the turn signals are clear against the brake pattern.
Headlight Usability Without Scattering Glare
As with headlights, the beam is controlled and headlights can be adjusted to meet the requirement of the drivers.
An upgrade of the headlights must enhance light usability, with light-scattering glare reduction. Find optics that provide a clean cutoff and even spread particularly when you ride at night, after long days of touring. It is not only brighter, but also lower eye strain and increased hazard detection.
Step 2: Electrical Accessories That Hold Everything Steady
Camera and lighting are only useful in case they remain dependable. The silent failure mode of most touring construction is untidy wiring, circuit overload, and lack of grounding.
Use an Adequate Power Distribution Strategy
Rather than putting multiple accessories, one above another, on random taps, employ a fused distribution block or an accessory harness. This maintains loads apart, facilitates easier troubleshooting and safeguards factory wiring in your bike. It also provides you with clean expansion options in the future such as additional lights, dash camera, or heated clothing.
Select Switched Power Where It Applies
Numerous riders quickly come to know that accessories left on constantly may drain the battery. Always leave switched circuits on things that are only required during riding like auxiliary lights and camera systems. Only necessary things that require an unswitched line must have it, such as a battery tender lead or an emergency USB outlet.
Mind Capacity and Minimize Clutter
Gold Wings can carry touring loads and any additional device is an attraction. Use effective LEDs, do not use inexpensive converters which use more power as heat, and maintain short and covered runs of wiring.
Proper loom and weatherproof connectors and clean routing is not only aesthetic, but it avoids intermittent faults that become evident after a rain or vibration.
Step 3: Camera Setup to Tour Busy Traffic
Your silent witness is a camera set up. It can also be helpful in stressful settings when there is a lot of people around since you are assured that you have a record in case one of them goes off.
The Base Is Front and Rear Coverage
A single camera is good, but front and back coverage is where the money is. The front records the lane violations, abrupt mergers, and angles of impact. The rear records tail gating, brake-check, and rear-end accidents.
Location Is Far More Important Than Price
Install the cameras at a place that has an open view and reduced vibration. Do not put them in such a place where buffeting of air makes the picture shaky. Stable mount can be better than the most exalted camera spec sheet on the touring bikes. The system failed in case the footage becomes unreadable when it is critical.
Power Integration: Set It and Leave It Recording
The trick of touring compatibility is hardwired recording with automatic start/stop. You do not have to remember having to charge batteries or to press record every morning. Connect the system to your electricity scheme such that it turns on when the bike is on and is turned off in a neat manner.
Storage and Weather Preparations
Record with high-endurance memory cards that are to be checked after a period of time. Touring bikes are normal on rain, heat, and vibration, and therefore select weather-resistant camera units and cover connectors with quality sealing.
Step 4: Assemble It All as a Workable Safety Build
The following is the plain reasoning that I would advise over the years of watching riders pursue the objectives of random upgrades. Begin with layers of visibility, and keep them up with due power, and then in addition, recording.
The first step is to add front conspicuity lighting and a rear light upgrade that improves on the illuminated space. Install a fused distribution solution and thereby wire routes are next to be installed properly. Last, equip it with a front and rear camera system hardwired with a stable mount and high endurance storage.
It is a contrast of night and day. It is not the bike with lots of accessories that do not always work, it is a system that seems to be factory-clean and reliable. That dependability is what is allowing you to concentrate on riding in heavy traffic.
Conclusion: Safer Touring Build That Has Cleaner Appeal and Works Each Time
A Gold Wing safety construction does not consist in adding gadgets to the bike. It is concerned with the selection of lighting, which will evoke an immediate identification and supplement it with consistent electrical design, and the inclusion of cameras that will capture what occurs during erratic traffic flows. Once all the integration is in place, the bike becomes more relaxed, noticeable and reliable over long days.
To build a ride that is safe, clean, and reliable without having to wear a helmet, ShinyWing gathers those safety-conscious finishing details in such a manner that it allows practical touring.
FAQs
Does a brighter light necessarily make a Gold Wing safer?
Not always. Beam pattern, aiming and placement are frequently more important than crude brightness. The most secure systems enhance visibility without producing glare to the proceeding traffic.
Is it dangerous to install several electrical accessories on a touring bike?
It may be, whether you add accessories to factory wiring not fused and distributed appropriately. A special fused installation maintains loads and protects the electrical system of the bike.
What do I need to focus on: the lights or the cameras?
In case of a tight budget, the first step to take is to upgrade the visibility first since it aids in preventing incidents. Cameras are superb on evidencing and being at ease, yet lights can assist you in getting to be seen sooner.
Why is a camera set up suitable when it is time to go on a long touring day?
Hardwired power, stable mounting, weather effects and high-endurance memory cards. You desire an automatic recording system that can also be read in vibration and rain.
Are these upgrades something I can install on my own?
Simple installations can be done by many riders but electrical installations require careful routing, proper fusing and proper connections. In case of doubt, professional installation will save you a lot of money that would be wasted on future errors.